LinuxPizza

Personal notes and occasional posts – 100% human, 0% AI generated

After 5 years, the Linux.Pizza Matrix-server is relauching. Last time, we housed over 3k active accounts.

However, 3k active accounts is not something that we aim to achieve this time, but rather – a complement to your social.linux.pizza Mastodon account.

We achieve this by just enabling social.linux.pizza as a OIDC-provider on the matrix-server – the same functionality that already is being used when you authenticate your mobile application.

In order to login with your social.linux.pizza account. Just used the Matrix-client you prefer (Element(X), SchlidiChat/SchlidiChat Next, Cinny or even Thunderbird) – set “synapse.linux.pizza” as your “Homeserver”, and the option to login with social.linux.pizza should appear.

Image showing the login-process to the Linux.Pizza Matrix-server

Image showing the login-process to the Linux.Pizza Matrix-server

Image showing the login-process to the Linux.Pizza Matrix-server

Image showing the login-process to the Linux.Pizza Matrix-server

Worth noting, is that this service will launch as a Beta-service, so every tester is welcome :)

Writing this down, so people and myself can easily find this solution

The Cisco docs is incomplete, this is the correct way of enabling SNMP on the SG350 series:

configure term
snmp-server community public RO
snmp-server community private RW
snmp-server server
snmp-server location hackerspace

Thanks to @fedops@fosstodon.org for telling me about the “snmp-server server” step.

#cisco #networking #switching #snmp #observium

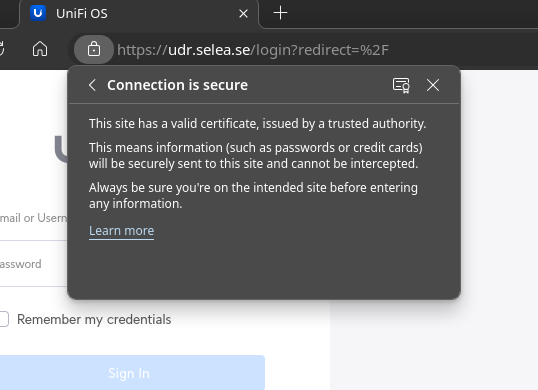
I dont claim responsibility for anything being done on your router. This short TODO is written for myself – dont follow if you are not familiar with certificates and PKI.

1 SSH into your machine 2. Navigate to /data/unifi-core/config 3. Replace unifi-core.key with your private key 4. Replace unifi-core.crt with your TLS-certificate 5. Restart Unifi Core:

systemctl restart unifi-core

Done! A screenshot, showing a valid certificate on udr.selea.se, located on a Unifi Dream Router

#linux #pki #certificates #unifi

LVM stuff

WARNING: PV /dev/sda2 in VG vg0 is using an old PV header, modify the VG to update.

Update the metadata with the vgck command – where the “vg0” is your own pool.

vgck --updatemetadata vg0

curl stuff

Curl a specific IP with a another host-header

curl -H "Host: subdomain.example.com" http://172.243.6.400/

git stuff

tell git.exe to use the built-in CA-store in Windows

git config --global http.sslBackend schannel

random stuff

See which process is using a file

fuser file

Import RootCert into Java-keystore example

sudo /usr/lib/java/jdk8u292-b10-jre/bin/keytool -import -alias some-rootcert -keystore /usr/lib/java/jdk8u292-b10-jre/lib/security/cacerts -file /usr/share/ca-certificates/extra/someRoot.crt`

Apache2 configs example

Enable AD-authentication for web-resources

<Location />
   AuthName "AD authentication"
   AuthBasicProvider ldap
   AuthType Basic
   AuthLDAPGroupAttribute member
   AuthLDAPGroupAttributeIsDN On
   AuthLDAPURL ldap://IP:389/OU=Users,OU=pizza,DC=linux,DC=pizza? 
   sAMAccountName?sub?(objectClass=*)
   AuthLDAPBindDN cn=tomcat7,ou=ServiceAccounts,ou=Users,OU=pizza,dc=linux,dc=pizza
  AuthLDAPBindPassword "exec:/bin/cat /etc/apache2/ldap-password.conf"
  Require ldap-group 
  CN=some_group,OU=Groups,OU=pizza,DC=linux,DC=pizza
  ProxyPass "http://localhost:5601/"
  ProxyPassReverse "http://localhost:5601/"

</Location>

Insert Matomo tracking script in Apache using mod_substitute

AddOutputFilterByType SUBSTITUTE text/html
Substitute "s-</head>-<script type=\"text/javascript\">var _paq = _paq || [];_paq.push(['trackPageView']);_paq.push(['enableLinkTracking']);(function() {var u=\"https://matomo.example.com/\";_paq.push(['setTrackerUrl', u+'matomo.php']);_paq.push(['setSiteId', '1']);var d=document, g=d.createElement('script'), s=d.getElementsByTagName('script')[0];g.type='text/javascript'; g.async=true; g.defer=true; g.src=u+'matomo.js'; s.parentNode.insertBefore(g,s);})();</script></head>-n"

Load balance backend-servers

<Proxy balancer://k3singress>
	BalancerMember http://x.x.x.1:80
	BalancerMember http://x.x.x.2:80
	BalancerMember http://x.x.x.3:80
	BalancerMember http://x.x.x.4:80
	ProxySet lbmethod=bytraffic
	ProxySet connectiontimeout=5 timeout=30
	SetEnv force-proxy-request-1.0 1
	SetEnv proxy-nokeepalive 1
</Proxy>
       ProxyPass "/" "balancer://k3singress/"
       ProxyPassReverse "/" "balancer://k3singress/"
       ProxyVia Full
       ProxyRequests On
       ProxyPreserveHost On

Basic Apache-config for PHP-FPM

<VirtualHost *:80>
  ServerName www.example.com
  DocumentRoot /srv/www.example.com/htdocs
  <Directory /srv/www.example.com/htdocs>
    AllowOverride All
    Require all granted
    DirectoryIndex index.html index.htm index.php
    <FilesMatch "\.php$">
      SetHandler proxy:unix:/run/php/www.example.com.sock|fcgi://localhost
    </FilesMatch>
  </Directory>
  SetEnvIf x-forwarded-proto https HTTPS=on
</VirtualHost>

Basic PHP-fpm pool

[www.example.com]
user = USER
group = GROUP

listen = /var/run/php/$pool.sock

listen.owner = www-data
listen.group = www-data

pm = ondemand
pm.process_idle_timeout = 10
pm.max_children = 1

chdir = /

php_admin_value[sendmail_path] = /usr/sbin/sendmail -t -i -f no-reply@ftp.selea.se
php_admin_value[mail.log] = /srv/ftp.selea.se/log/mail.log
php_admin_value[open_basedir] = /srv/ftp.selea.se:/tmp
php_admin_value[memory_limit] = 64M
php_admin_value[upload_max_filesize] = 64M
php_admin_value[post_max_size] = 64M
php_admin_value[max_execution_time] = 180
php_admin_value[max_input_vars] = 1000

php_admin_value[disable_functions] = passthru,exec,shell_exec,system,proc_open,popen,curl_exec,curl_multi_exec,parse_ini_file,show_source,mail

Netplan – use device MAC instead of /etc/machine-id for DHCP

network:
  ethernets:
    eth0:
      dhcp4: true
      dhcp-identifier: mac
  version: 2

HPs apt repo for various utilities for proliant machines

deb http://downloads.linux.hpe.com/SDR/repo/mcp buster/current non-free

psql stuff

CREATE DATABASE yourdbname;
CREATE USER youruser WITH ENCRYPTED PASSWORD 'yourpass';
GRANT ALL PRIVILEGES ON DATABASE yourdbname TO youruser;

Get entity for AD/SMB based user so you can put it in /etc/passwd:

getent passwd USERNAME

#linux #kubernetes #netplan #php-fpm #apache #LVM

Imagine my suprise when I could not tail the syslog anymore..

Debian 12 has moved the syslog to journalctl. So just run journalctl -f and you will be greeted with the logs running throu the screen :)

If you want to check the logs from for example apache:

journalctl -u apache2.service

If you want to format the logs as json, just append o json-pretty

#linux #debian #logging

8 years ago, I saw a post somewhere about a pretty small niché distro that was looking for a mirror for its packages. That got me thinking about the possibility to provide a public mirror for Linux packages for various distros.

It started back then in my home office, with redundant ISP and the two HP Microservers and the Supermicro box that I had running. My ambitions did not stop, and I applied to be an official mirror for Debian, Ubuntu, Parabola, Linux-Libre and more in the weeks after.

One year after that, I got access to a nice environment that my friends had. With 100TB of storage and unlimited bandwidth – I moved the mirror there, and it has been living there ever since.

Fast forward a couple of years...

The small distros that mirror.linux.pizza was the sole mirror for has dissappeared, and the other projects such as Parabola, EndeavourOS and PureOS where I was the first one to start mirroring them – has gotten plenty of more mirrors to help out.

I've decided to shut mirror.linux.pizza down, the reason is financial and I want to focus my effort on the community that is social.linux.pizza instead.

I've already notified the different projects about the shut down, and I will take steps to ensure that systems does not break after the mirror goes offline, such as HTTP-redirects to other mirrors in the nordic.

I've also reached out to the hosting providers that have been using the mirror exclusively to notify them about the upcoming change, so they can prepare for that aswell.

I am thankful that I have been able to give something back to the community by hosting this mirror – around 100k unique IP-addresses connect to it every day. So it did definitely help out!

#linux #mirror #mirrorlinuxpizza #sunset #debian #ubuntu #pureos

Just some random #kubectl commands for myself. I have tested these on 1.20 <> 1.25

Get all ingress logs (if your ingress is nginx)

kubectl logs -n ingress-nginx -l app.kubernetes.io/name=ingress-nginx

Get all logs from Deployment

kubectl logs deployment/<deployment> -n <namespace> --watch

Why is the pod stuck in “ContainerCreating”?

kubectl get events --sort-by=.metadata.creationTimestamp --watch

Restart your deployment, nice and clean

kubectl rollout restart deployment/<deployment> -n <namespace>

I'll add more when I find more usefull stuff

#linux #k8s #kubernetes #kubectl #ingress #nginx #deployment #logs

Hopefully this will save some of you alot of time, energy, and save you day.

I recently had troubles getting a job to work. The short story is:

Download all files in a remote catalogue, over SFTP, on certain times.

I had a working solution with curl, but when the naming of the files changed (such as whitespaces) – the function broke.

lftp – the saver

After have spent a couple of hours trying to grasp lftp via the manpage, I came up with a solution:

lftp -c '
open sftp://USER:PASSWORD@remoteserver.example.com:22
mirror --verbose --use-pget-n=8 -c /remote/catalogue/ /local/catalogue/
'

And if you want to remove the source-files after download:

lftp -c '
open sftp://USER:PASSWORD@remoteserver.example.com:22
mirror --Remove-source-files --verbose --use-pget-n=8 -c /remote/catalogue/ /local/catalogue/
'

This download all files in the specified remote catalogue to the specified local one, then exits.

#linux #bash #sftp #lftp

Here is a post about Windows for a change.

If you want to check if you can query a NTP-server from your Windows-machine, you can just use the following

w32tm /stripchart /computer:computername

For example:

w32tm /stripchart /computer:ntp.netnod.se

If everything works, you'll see something like this:

Tracking ntp.netnod.se [194.58.200.20:123].
The current time is 2022-12-06 14:06:13.
14:06:13, d:+00.0260863s o:+00.0277480s  [      *      ]

Have a pleasant tuesday

#windows #ntp

OmniOS - The distant cousin to Linux

Linux distant cousin – OmniOS

Not so long ago, there where plenty of cousins alive and well in the world. You may have heard about Solaris, IRIX, AIX, HP-UX – in this post, we will explore the grand-child to SunOS called OmniOS

OmniOS is based on the Illumos kernel – a fork of the long forgotten and abandoned OpenSolaris kernel that famously was killed by Oracle shortly after the takeover from Sun Microsystems (rest in peace).

I personally, are not fond of a homogeneous IT world, where every system is basically the same. I do think that diversity is good. So I hope that I can you as a reader interested in different Linux-alternatives (that is not BSD).

So, pick the hypervisor you want (Proxmox, VMWare, AHV, VirtualBox) and navigate to https://omnios.org/download to download the latest stable .iso.

The installation itself is very straight forward, so I'll be skipping that part here.

When you have installed the system, and rebooted – we need to get networking up and running. Login to the machine with the user “root”, and no password.

Lets enable networking, start by displaying the network-ports on your system. In my case – I'm using a virtualized Intel e1000 network card (available in basically every hypervisor)

dladm show-link -o link

Output:

LINK
e1000g0

Great, since this virtual machine only have a single NIC – this output is expected.

Lets create the interface, give it an IPv4 and add a default route via the network gateway:

ipadm create-if e1000g0
ipadm create-addr -T static -a 192.168.2.38/24 e1000g0/v4
route -p add default 192.168.2.254

Verify that you have network connection with ping:

ping 8.8.8.8
8.8.8.8 is alive

DNS-resolution is not yet working, so we have to take care of that. Lets modify /etc/resolv.conf with the following

echo "domain local.lan" > /etc/resolv.conf
echo "nameserver 192.168.1.254" >> /etc/resolv.conf

In some cases, I have had to overwrite nsswitch.conf aswell:

cat /etc/nsswitch.dns > /etc/nsswitch.conf

We should be able to resolve our way into the internet now:

ping linux.pizza
linux.pizza is alive

Create a user and enable SSH, most of you will probably recognize the steps, since they are fairly basic and do not differ that much from how you would to in on a modern Linux machine

Let's start by create a user:

useradd -m -d /home/jonathan -s /bin/bash jonathan

And set a password for the user, you can do it for the root-user aswell:

passwd jonathan
New password:
...

And last, enable the SSH-service:

svcadm enable ssh  

Great, you should now be able to SSH-into the machine with the user you just created. You can elevate yourself into the root-user with the “su” command. Not that complicated, right?

Let's update the system.

Lets update the package-information from the repositories

pkg refresh
pkg update

Just let this run, your system will be updated. In some cases, your system will have to reboot.

And here, is where OmniOS shines – you can reboot your system – test it after you have performed the updates, and if stuff does not really work, you can simply rollback the changes you've made with beadm

Rollback the system

After you have rebooted your system, check the output of beadm list

root@omnios:~# beadm list
BE               Active Mountpoint Space  Policy Created
omnios-r151038an -      -          65.40M static 2022-12-03 15:35
omnios-r151038ca NR     /          1.35G  static 2022-12-03 16:14

You'll see to environments, and the one marked with “NR” is the current active one. If you want to rollback, you could execute (in my case) `beadm activate omnios-r151038an

root@omnios:~# beadm activate omnios-r151038an
Activated successfully
root@omnios:~# 
root@omnios:~# 
root@omnios:~# 
root@omnios:~# ls
1
root@omnios:~# beadm list
BE               Active Mountpoint Space   Policy Created
omnios-r151038an R      -          869.15M static 2022-12-03 15:35
omnios-r151038ca N      /          580.90M static 2022-12-03 16:14

Then do a quick reboot to boot into the active one. Let's check the current active environment after the system has rebooted:

root@omnios:~# beadm list
BE               Active Mountpoint Space   Policy Created
omnios-r151038an NR     /          872.95M static 2022-12-03 15:35
omnios-r151038ca -      -          583.64M static 2022-12-03 16:14

And we can see that the old one, created at 15:35 is the one that is currently active. We can now remove the newer one, since we dont need it anymore:

root@omnios:~# beadm destroy omnios-r151038ca
Are you sure you want to destroy omnios-r151038ca?
This action cannot be undone (y/[n]): y
Destroyed successfully
root@omnios:~# beadm list 
BE               Active Mountpoint Space   Policy Created
omnios-r151038an NR     /          748.05M static 2022-12-03 15:35

So, what is the practical / real world use for OmniOS?

Since OmniOS use ZFS, anything storage-related makes sense, such as a Network Attached Storage (NAS) even a Virtual Machine Host with the bhyve hypervisor – which itself is very interesting.

If you are interested in more, you can check out my older post about Tribblix here.

#unix #solaris #omnisos #illumos #tribblix #zfs